Modeling a Chess Board in Blender
If you want to learn how to model an object in Blender, then start with a very easy and basic object, like a chess board.
First if you don't know what Blender is then you can learn more at www.blender.org/.
Or you can download the Blender software for free at www.blender.org/download/.
Once you have got Blender installed, launch it, and you will see a default start up scene like this.
Press X on your keyboard and select Delete from the menu to remove the cube. Then press 7 on your numeric keypad to go to a direct top view.
Note: If you don't have a number pad on your keyboard, you can get a top view by clicking on View from the top left menu, then Viewpoint, then Top.
Next, hold Shift and press A to bring up the Add menu. Choose Mesh, then Plane.
Now with the plane selected, switch to edit mode.
Once in edit mode, deselect all the vertices by holding down ALT and pressing A on the keyboard. Just pressing A will select all vertices, but we only want the two vertices on the right side of the plane to be selected.
Press B to use the box select tool. Then use the mouse to click and drag a box around the two right vertices.
Once we have the right edge vertices selected, press E to extrude, press X to lock the extrusion to the x-axis, and press 2 for the distance, then press Enter to complete.
Now do that six more times to create a whole row of squares.
Deselect all the vertices again. Then use the box select tool to select all the top row vertices.
Then press E, then Y, then 2, then enter.
You should now have another row of squares. Repeat this until you have eight rows.
Press A to select all. Then press N to open the Item Transform menu. Change the Median X, Y, and Z values to 0. This will center the chess board on the grid.
Deselect all vertices. What we are going to do now is select only the outer edge vertices of our chess board.
Use the box select tool to select all the outer edge vertices.
Press E to extrude, then S to extrude by size. Then press 1.15 and then Enter.
Next, without deselecting and vertices, press 1 on the number pad, to get a front view.
Then press E, then Z, then -.25 and then Enter.
Next, press 7 on the number pad for the top view again. Then press E, then S, and then 1.05 and finally Enter.
Once again switch to the front view by pressing 1. Then E, Z, -.5, and Enter. Last thing, press F. That will add the final face to our 3d chess board model.
Our chess board has no material properties yet. We are going to need three different material. One for the white squares, one for the black, and one for the rest of the chess board.
Lets create our first material.
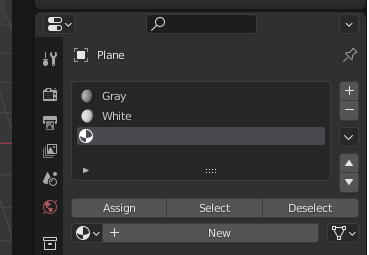
Near the right side of the screen, click on the Material Properties tab. It looks like a red checkered ball.
This opens the Material Properties pane. Inside you will see a button labelled New. Click this to add a new material. Then name it, something like, Gray.
Next, switch the main window to the Shader Editor. You can do this when your mouse is in the 3D view port hold Shift and press F3.
Then hold Shift and press A to bring up the Add menu.
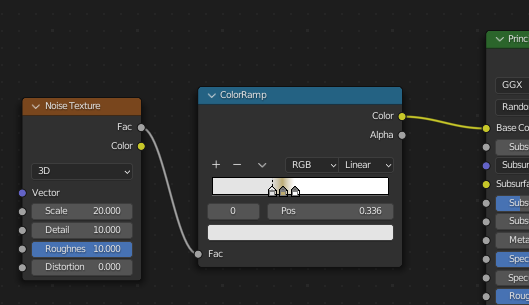
Search for ColorRamp and add it. Then use the add menu and select Texture and then Noise Texture.
Use the mouse to drag a connection line from Noise Texture Fac to ColorRamp Fac. Then drag a connection from ColorRamp Color to Principled BSDF Base Color.
In the Noise Texture Node set the Scale value to 20, the Detail value to 10, and the Roughness value to 10.
In the ColorRamp, click on the + sign to add a third slider. Set the right slider to bright white. The center slider to a dark gray, and the left slider to a light gray color. To change the color value of a slider, click on the colored rectangle underneath the Pos. Move each end slider a little more toward the center slider. This completes our gray material.
Now in the Material Properties Window, click on the + symbol to add a new material. Click the New material button and name it "White".
Switch your main window back to the 3D Viewport. Then in the top left part of the window you will see three little buttons.
The first is Select Mode Vertex, the second is Select Mode Edge, and the last is Select Mode Face. Choose Select Mode Face.
Then select every other square to make a checker pattern. You will need to hold down the Shift key.
Then, with your White material selected, click the Assign button.
Now lets add some detail to our White material.
Switch the main window back to the Shader Editor.
Once again we will add the ColorRamp and Noise Texture. Set the Noise Texture values the same as before. On the ColorRamp, have three sliders again. Set the right one to bright white, the middle to an off golden color, and the left one to a slightly duller white. Then move the three sliders toward the middle of the ColorRamp and pinch them close together.
Things are starting to look like a chess board. We just need one more material. Add a new material, call it "Black", and assign it to the remaining squares. Then, again, add a Noise Texture and ColorRamp to the material. Pretty much the same as before. Only this time change the colors to dark gray, white, and dark black.
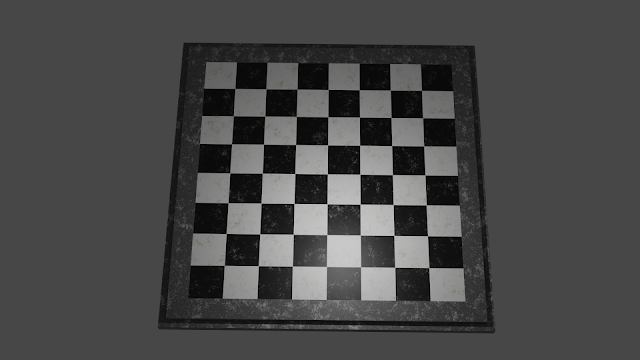
If you followed these instructions correctly you should have a chess board that looks like this one.
I hope you liked this tutorial. Thanks for reading.


Comments
Post a Comment