How to Create an Image Map
What is an image map? An image map is when you use a single
image and nest multiple links in different areas of the image. Imagine using a
picture of your friends, and you make it so that when you click on a friend’s
face, you are directed to that friend’s Facebook page.
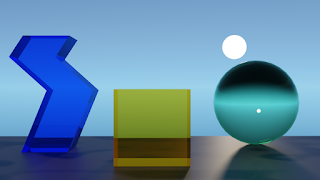
Let's create our own image map now. Like this one.

If you move the mouse pointer over the glass objects in the
picture above, you will see that they are links. True, I made all three of the
links go to the home page of this blog. It would, probably, be more practical
for each link to go some place different, but you get the point.
Here is how it is done.
Lets go through the code one new concept at a time. First notice our image element. It has a new attribute called 'usemap'.<!DOCTYPE HTML>
<html>
<head>
<title>An Image Map</title>
</head>
<body>
<img src="for_image_map2.png" alt="Glass Objects" usemap="#myMap" style="height: 261px; width: 463px;">
<map name="myMap">
<area shape="rect" coords="163,128,275,242" alt="cube" href="https://gamecodeplus13.blogspot.com" title="That tickles!">
<area shape="circle" coords="370,147,62" alt="circle" href="https://gamecodeplus13.blogspot.com" title="Easy now.">
<area shape="poly" coords="32,50,101,50,110,58,93,86,142,131,110,211,100,220,30,220,66,131,11,82"
alt="polygon" href="https://gamecodeplus13.blogspot.com" title="Hello.">
</map>
</body>
</html>
<img src="for_image_map2.png" alt="Glass Objects" usemap="#myMap" style="height: 261px; width: 463px;">
The 'usemap' attribute contains the name of the map element that we want associated with this image.
Next, we have our map element. It's name attribute is "myMap".
<map name="myMap">
</map>
Notice in the image element, when we reference our map by name, we precede the name with a '#' symbol. Very important...
Nested in the map element, is our area elements. They do not need an end tag. The area elements are where all the magic happens.
The first attribute of the area element is our shape attribute.
<area shape="rect" coords="163,128,275,242" alt="cube" href="https://gamecodeplus13.blogspot.com" title="That tickles!">
We can have a value of 'rect' for a box or rectangle shape, a value of 'circle' for a round shape, and a value of 'poly' for any shape that is not a rectangle or a circle.
You know what the alt, title, and href attributes do from earlier tutorials, so lets talk about the coords attribute.
Any image is made of colored dots called pixels. The image has a width value and a height value. In the example above, my image is 261 pixels tall and 463 pixels wide. If you think of the pixels as being arranged in a grid, then each pixel would have its own address made from a pair of numbers, much like x, y values on a grid.
The rect shape needs two pixels to define a rectangle area, one at the top left, and one at the bottom right of the area. The first pixel is located 163 pixels from the left edge and 128 pixels down from the top. So the coords value of my first pixel is 163,128. The second pixel is located at 275,242. If you could visual the area it would look something like this.
<area shape="circle" coords="370,147,62" alt="circle" href="https://gamecodeplus13.blogspot.com" title="Easy now.">
The circle shape area needs a single pixel at the center of the area, and the third value is the radius of the area. So the center of the area is 370,147 with a radius size of 62 pixels.
<area shape="poly" coords="32,50,101,50,110,58,93,86,142,131,110,211,100,220,30,220,66,131,11,82"
alt="polygon" href="https://gamecodeplus13.blogspot.com" title="Hello.">
The poly shape is for any irregular shaped polygon. It is just a series of pixel addresses. In my example, I needed ten pixel addresses to define the area. The first pixel was at 32,50 and so on.
So, how do you find the pixel addresses needed to determine an area? Well, you can load your image into an image editor like Paint or Gimp. These will show you pixel addresses. But if your Web page resizes the image bigger or smaller, then the addresses you got from your image editor won't match the image in your Web page.
An easy solution to this, is to write a dummy Web page with some JavaScript that can reveal the pixel addresses when you move the computer mouse over the image. Here is some code for you...
<!DOCTYPE html>
<html>
<head>
<title>Pixel Finder</title>
</head>
<body>
<p id="textArea">
</p>
<img src="your_image.extension" id="myImage" onmousemove="getPixel(event)" style="height: ?px; width: ?px;">
<script>
function getPixel(event) {
var yPos = document.getElementById("myImage").y;
var xPos = document.getElementById("myImage").x;
document.getElementById("textArea").innerHTML = (event.clientX - xPos) + "," + (event.clientY - yPos);
}
</script>
</body>
</html>
Just change the img source to your image file, and then put in the height and width values. Finally save the file as an HTML file and you are all set. Once the browser displays your image, you can move the mouse pointer over the image and see its pixel location.
Since this is only an HTML tutorial, I will explain the JavaScript code in another tutorial to come.
Warning! Now this is important. When you make an image map, you need to lock in the height and width values of your image with the style attribute and CSS code. If you don't do this then the browsers may try to scale your image to fit different screen sizes. If your image isn't at a fixed size, and your image is allowed to scale bigger or smaller, then your image map won't match up with your image.
When that happens, you end up with a funky image map that does not work right. And that is no fun. Or maybe it is more fun, depending on how you look at it.
Thank you for taking the time to read this tutorial. You are doing very well. The next tutorial will drop back down to a much easier topic. We will learn about comments and lists. An odd pairing to be sure, but why not?


Comments
Post a Comment